Desperate Times
Quest Details
| Difficulty | Intermediate |
|---|---|
| Type | Quest |
| Length | Medium |
| Quest Points | 3 |
| Members | Yes |
Start Point
2nd Floor of Burthorpe Castle.
Requirements
Skill Requirements
Quest Requirements
Items Needed
| 3 Rune bars | 2 Runite stone spirits | 10 Mind runes | Disguise for Black Knights' Fortress* | ||||
| 10 Gleaming energy | Old necklace or Necklace of Charos |
*Appropriate disguises include:
- Dulcin armour cosmetic override
- Guard uniform
- $ilnkfull180
- Iron chainbody
- Black armour
- Dagon'hai robes
- Elite black armour
- Black Knight captain's armour
Items Acquired During Quest
| 2 Phoenix Lair teleports+ | Memory strands+ | Fairy Rings unlocked+ | Digsite Pendant | ||||
| Gear to fight 5 level 50 monsters* |
*Ranged suggested for Defence reasons
+Interchangeable for quick access to the Needle
Walkthrough
-
Teleport to Burthorpe and climb the stairs to the second floor. Seren can be found at the far West side of a large round table with various Gielinorian gods and factions surrounding it. She will welcome you to the gathering and, once you have accepted starting the quest, a cutscene will begin after prompting you to enable sounds if you don't have them on already. In the cutscene, Seren will explain the current threat Gielinor is facing – the Elder Gods are waking up. She will suggest starting simple by contacting Bik, the Elder God most associated with nature and plant life. To do this properly, she proposes that a great garden be created to show Bik the nature and beauty that can be found on Gielinor. As you are the neutral party here, she asks that you speak with the council to discover a location, workers, and seeds with which to create this garden.
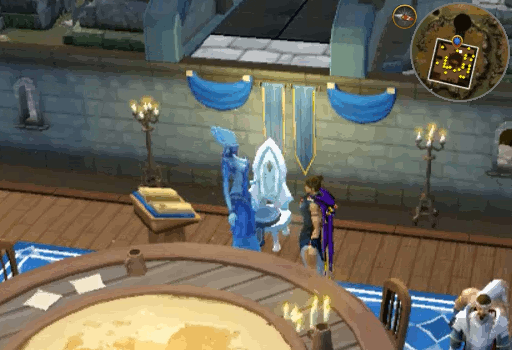 Image last updated: Jun 08, 2022 Update Image?
-
Walk around the room and speak with the various visitors. You will have 3 people to choose from for each of the necessary components of the plan: the location for the garden, who is making it, and who will supply the seeds.
Once you have chosen an option for each category, you will be asked if you wish to propose them to the council. Choosing "No" will allow you to continue speaking with the council and replace any option you have currently selected while "Yes" will tell them what you have decided. When you present your choices, someone will have a reason to not like one of them and you will be allowed to revise your plan. You can choose to either simply talk to another person to replace any option(s) you desire or you can lobby/log out to completely reset your choices.Location Workers Seeds Osman – Northern Desert Sir Amik Varze – White Knights Azzanadra Vanescula – Swamps of Morytania Brundt – the Fremennik Garlandia Zarador – Feldip Hunter Grounds Moia – Undead King Roland
As your choices will ALWAYS fail, it is quickest to simply speak to a different person to change your choice and present again.
-
Once it has failed for the third time, Kerapac will appear and make a snide remark about the Dragonkin not being invited before he informs the council that he has another plan that may work. The council will almost unanimously agree to give this method a try as they could not agree on Seren's garden plan details. Once it is decided to follow Kerapac's plan, Thok will decide that he wants to be part of the "great battle" and insist on joining you. Unable to convince Thok otherwise, Kerapac will easily give up and tell you to meet him at the Needle where he will explain the details of the plan.
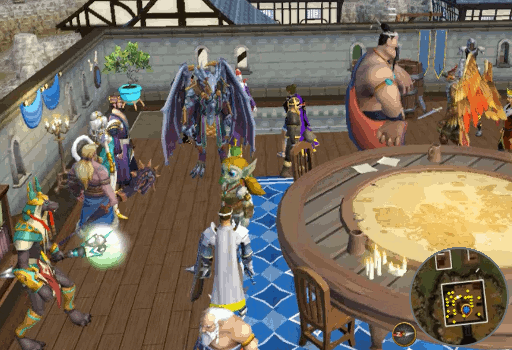 Image last updated: Jun 08, 2022 Update Image?
-
You can reach the Needle several different ways: Eagles' Peak Lodestone then walk North West through the Piscatoris Hunter Area (or take the boat up to Piscatoris Fishing Colony and walk West), teleport to the Memorial to Guthix using Memory strands, use Fairy ring A-K-Q then walk North West, or use a Phoenix Lair teleport and walk North West. Note that these methods are listed from longest to shortest walking distance.
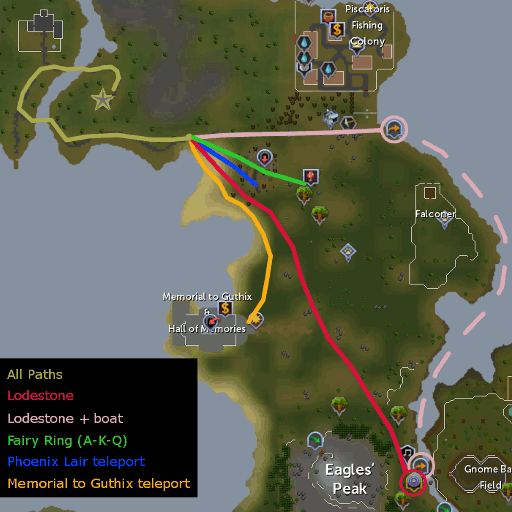 Image last updated: Jun 08, 2022 Update Image?
-
When you arrive to the Needle, speak with Kerapac. He will talk about how he can feel the Anima in the Needle moving about and that you should be able to feel it as well; choose any reaction to continue. Moving forward he will explain what the three of you will be doing. Thok will of course not understand any of this and you can choose whichever response to him you like before he asks what needs to be done to make it work. Kerapac will explain that he is going to try to attune the Needle, however, this will cause temporal instabilities which you will need to close. This can be done by simply clicking them to squeeze them closed. These will be found just North of the Needle, on the West side of the river, near the front West corner of the house, and in each bedroom on the second floor of the house (See map below).
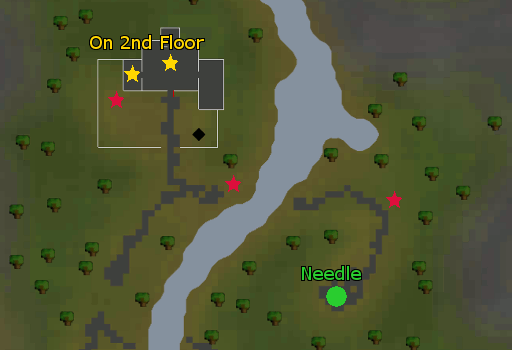 Image last updated: Jun 08, 2022 Update Image?
-
After removing all five of the disturbances, return to the Needle and speak with Kerapac. He will attempt something that will fail as "the Needle will not work without the whims of its keeper". He will then suggest that it may be possible to trick it with the help of a great enchanter, Charos. You will now need to return to his tomb.
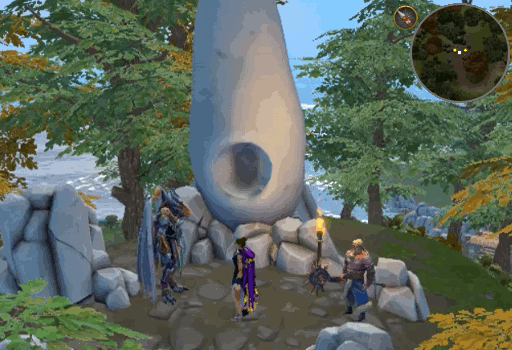 Image last updated: Jun 08, 2022 Update Image?
-
This area can be reached a few different ways. You can either teleport to Seers' Village and squeeze through the bars on the North Eastern section of the fence or you can use Fairy Rings code A-L-S. Both of these methods will grant you access to McGrubor's woods and from here, you will then need to climb down the "Mysterious hole" just South of the building.
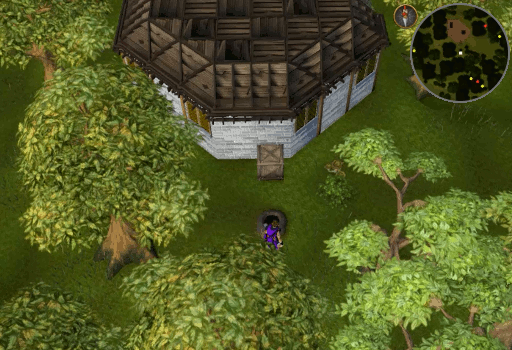 Image last updated: Jun 08, 2022 Update Image?
-
Once inside the tomb, walk to the main cavern and investigate the coffin. Doing so, you will receive a Letter from Charos. You will find it is a personal message from Charos inviting you to one last "waltz" in order to find him. He has hidden 3 enchanted keys around Gielinor which you must now find to enable the Old necklace (or Necklace of Charos) to break his disguise so that you can officially meet.
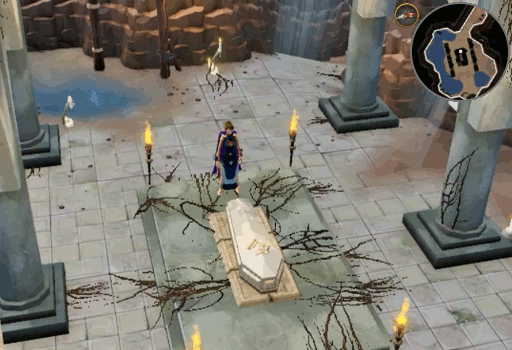 Image last updated: Jun 08, 2022 Update Image?
-
Be sure you have either version of the necklace then head to one of the 3 locations, these can be done in any order – outside the Empty Throne Room at the Digsite, East of the entrance within the Black Knights' Fortress (be sure to wear a disguise!), and on the second floor of Varrock castle within the bathroom to the East of the stairs (near the tub). For quest efficiency, it is suggested to do the Varrock location last. When you reach your desired location, step on the yellow portal and you will be teleported to an area that looks similar to Charos' tomb.
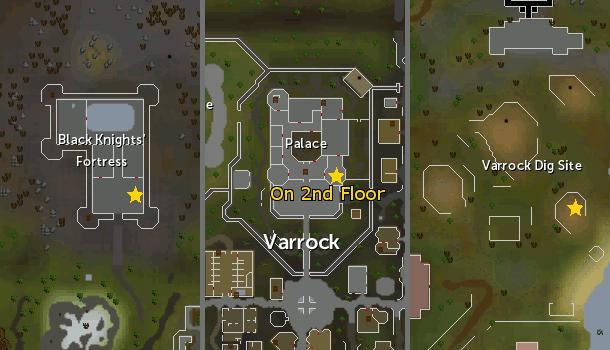 Image last updated: Jun 08, 2022 Update Image?
-
In the middle area you will see a slider puzzle that will currently not move. To be able to solve the slider, you must first unlock 2 or more chests in the surrounding rooms. In order to open the rooms, you will need to step on the various colored portals around the main room. Stepping on one of the portals will cause some of the doors to the surrounding rooms to open. There is no particular pattern to which ones you need to step on, simply choose whichever one(s) you like until the desired door opens – empty rooms hold no significance.
Logging out or lobbying while in one of the three locations will completely reset that location's puzzle, you will have new chests to unlock and a new slider to solve!
 Image last updated: Jun 08, 2022 Update Image?
-
When a door opens to a room containing a chest, you will now be able to solve that puzzle to decipher part of the pattern you will need to create with the slider puzzle; once opened, you do not need to check each individual chest for the slider code, you can wait to look until you have unlocked all chests in the area. In total, there are 5 different puzzles that you may encounter when opening the chests. All chests are unlocked using 4 letters. These can be selected by clicking the arrows below the desired lock and clicking the "Enter" button when you have made your selections. If you need to clear your choices, you can exit the window and try to unlock the chest again.
- Single item – There will be a single item on the floor of that room - This item cannot be collected. You will need to choose a four-letter word which represents what that item is and use that as the code to unlock the chest.
Examples:- Black claw = C-L-A-W
- Clean herbs = H-E-R-B
- Logs = L-O-G-S
- Abyssal whip = W-H-I-P
- Multiple items – When there are 4 items on the ground in the room (these items cannot be collected), you will use the first letter of each item for the code. Note that the code can be farthest to closest item or closest to farthest item and the items cannot be picked up.
Law talisman, Bread, Blood rune, Karamjan rum = L-B-B-K or K-B-B-L
- Old Recipe – This puzzle will have an old recipe on the ground and has 2 possible ways that it may need to be solved
- the first letter of the ingredient items
- 100 grams of Vanilla
- 7 Scoops of Queen black dragon eggs
- 115 grams of Potatoes
- 4 handfuls of Krandorian hops
V-Q-P-K
- the amount of the ingredients used and converted into Roman numerals (See coin section for conversion)
- 500 grams of Jangerberries
- 10 cups of Dwarven stout
- 1,000 grams of Anchovies
- 50 grams of Ice
D-X-M-L
- the first letter of the ingredient items
- Coins – This code will be based on the Roman numeral that each coin pile represents - Coins cannot be collected. It is best to examine each set of coins as it will tell you how many there are and enables you to have a record in case you forget the order.
- 1 = I
- 5 = V
- 10 = X
- 50 = L
- 100 = C
- 500 = D
- 1,000 = M
- Plaque – There will be a plaque on the outside of the room. Reading it will provide you with the crests for 4 locations. This code will be the first letter of each city crest presented. So,
 Image last updated: Jun 08, 2022 Update Image?
 Image last updated: Jun 08, 2022 Update Image?
 Image last updated: Jun 08, 2022 Update Image?
 Image last updated: Jun 08, 2022 Update Image?would be C-F-V-L for the code.
Icon City Icon City Icon City  Image last updated: Jun 08, 2022 Update Image?
Al Kharid  Image last updated: Jun 08, 2022 Update Image?
Ardougne (East)  Image last updated: Jun 08, 2022 Update Image?
Ashdale  Image last updated: Jun 08, 2022 Update Image?
Bandit Camp  Image last updated: Jun 08, 2022 Update Image?
Burthorpe Image last updated: Jun 08, 2022 Update Image?Canifis  Image last updated: Jun 08, 2022 Update Image?
Catherby  Image last updated: Jun 08, 2022 Update Image?
Draynor Village  Image last updated: Jun 08, 2022 Update Image?
Eagles' Peak  Image last updated: Jun 08, 2022 Update Image?
Edgeville Image last updated: Jun 08, 2022 Update Image?Falador  Image last updated: Jun 08, 2022 Update Image?
Fremennik Province  Image last updated: Jun 08, 2022 Update Image?
Karamja Image last updated: Jun 08, 2022 Update Image?Lumbridge  Image last updated: Jun 08, 2022 Update Image?
Lunar Isle  Image last updated: Jun 08, 2022 Update Image?
Menaphos  Image last updated: Jun 08, 2022 Update Image?
Oo'glog  Image last updated: Jun 08, 2022 Update Image?
Port Sarim  Image last updated: Jun 08, 2022 Update Image?
Prifddinas  Image last updated: Jun 08, 2022 Update Image?
Seers' Villaget  Image last updated: Jun 08, 2022 Update Image?
Taverley  Image last updated: Jun 08, 2022 Update Image?
Tirannwn Image last updated: Jun 08, 2022 Update Image?Varrock  Image last updated: Jun 08, 2022 Update Image?
Wilderness  Image last updated: Jun 08, 2022 Update Image?
Yanille
- Single item – There will be a single item on the floor of that room - This item cannot be collected. You will need to choose a four-letter word which represents what that item is and use that as the code to unlock the chest.
-
Once you solve the chest puzzles, you can search the last chest to discover the solution for the slider puzzle; be sure to either write this solution down or take a screen shot of it. Note that you can search the other chests sooner, but it is only necessary to check the last chest as it reveals the entire solution while the sooner ones only show part. Orient your view to the North, then click a tile near the empty space to move that tile into it. You will only be able to move 1 tile at a time. It is suggested to begin by solving any one side of the puzzle then solving the last 6 tiles.
If you log out or lobby before solving, you will need to complete a whole new set of puzzles for this location!
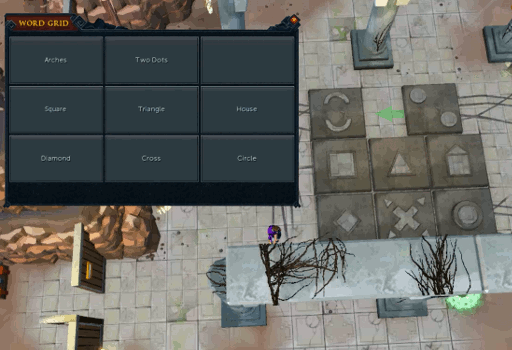 Image last updated: Jun 08, 2022 Update Image?
-
When you have successfully matched the slider puzzle to the solution, the room will shake and an enchanted key will briefly appear before it is added automatically to your necklace. Continue on to the other two locations and repeat the same puzzle process as above.
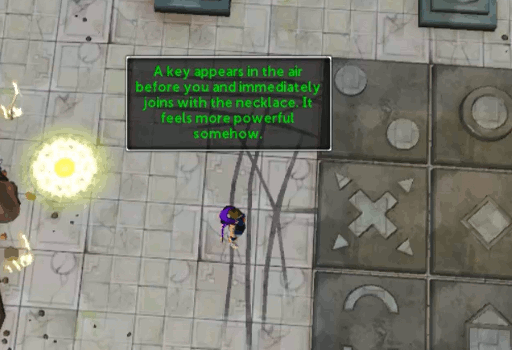 Image last updated: Jun 08, 2022 Update Image?
-
Upon completing the third and final slider puzzle, in addition to the key being added to your necklace, a strange phrase will enter your mind that seems rather familiar. Head to the Varrock library with your newly enchanted necklace, not that you will be able to detect any difference about it, and speak with Reldo.
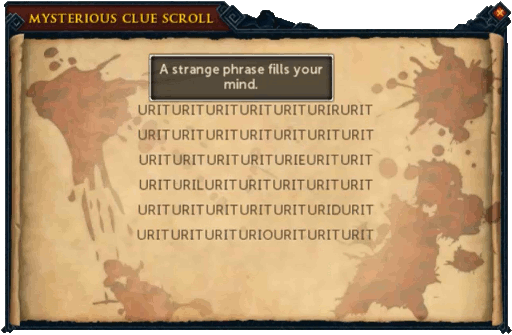 Image last updated: Jun 08, 2022 Update Image?
-
When initiating the conversation, you will be given the option to use the necklace. Do so to break Charos' disguise and truly see him. Choose whichever greeting you'd like and, after a brief discussion, Kerapac and Thok will join you in the library. Charos and Thok will have a short battle of names before Kerapac interrupts and broaches the reason they came searching for him. Thok will insist that you should just stare it down, with minimal encouragement from $plnkfull3503, he runs off to do just that. You will now need to give Charos: 3 Rune bars, 2 Runite stone spirits, 10 Mind runes, and 10 Gleaming energy to create the item that has been requested. If you have these items with you, you can quickly hand them over and continue. If you do not have these items, you will now have the opportunity to collect them and bring them to $plnkfull3503.
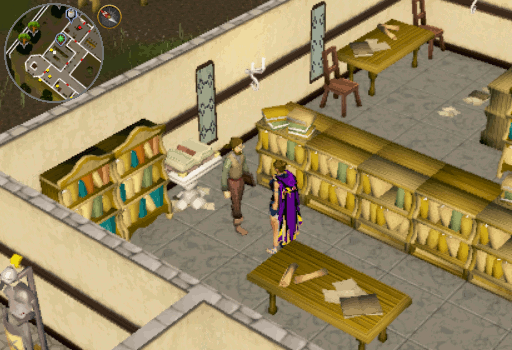 Image last updated: Jun 08, 2022 Update Image?
-
Once he has been given the items, your screen will blacken and you will pick up a random book to pass the time. In the end it turns out to be called "The Dusty Asgarnian Maid", though it initially says Lusty as it is dirty. After a brief wait, as Charos makes the item for Kerapac, your view will return and the three of you will need to rejoin Thok at the Needle.
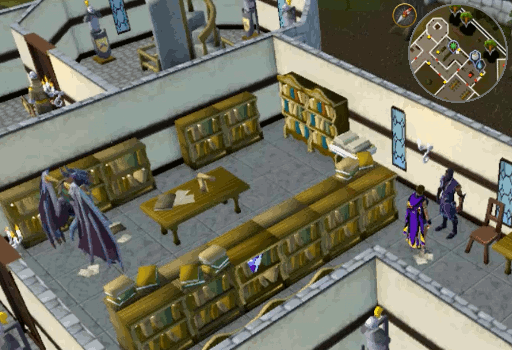 Image last updated: Jun 08, 2022 Update Image?
-
Equip and pack any gear necessary to fight five separate level 50 enemies (They have no weakness, but Ranged is recommended as they use Magic), then travel once again to the Needle via whatever method you choose. When you arrive, speak to Kerapac. Before there is a chance to test the new item and attune the Needle, Gail will intervene and you will need to enter the Needle on your own. Kerapac will warn you that he has no idea what you will see or what you must do to attune the Needle and reminds you to not let whatever happens there distract you from your mission.
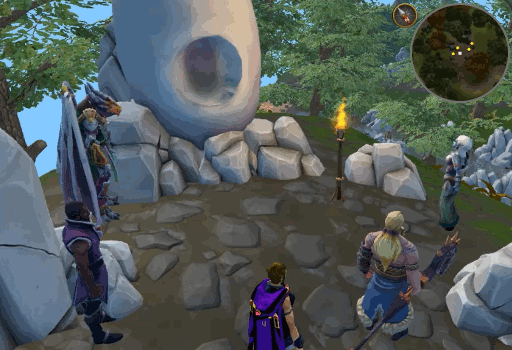 Image last updated: Jun 08, 2022 Update Image?
-
Your screen will fade and you will find yourself in an area that looks like the Guthix shrine. As you walk to the end of the hall, 5 clones of $plnkfull2889 will appear in specific locations (See map below). You will need to defeat each one of these to obtain a Broken shard of Sliske's mask. Once you have obtained all 5 shards, you can combine them into Sliske's mask.
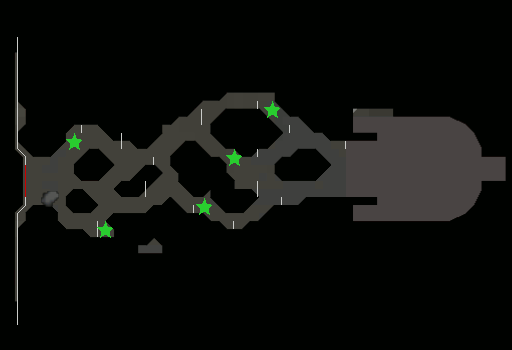 Image last updated: Jun 08, 2022 Update Image?
-
Don the mask and continue down the stairs toward Guthix. Click Guthix to kill him. This will begin a cutscene from when you witnessed Guthix's death originally.
 Image last updated: Jun 08, 2022 Update Image?
-
Once he has been killed again, you will find yourself on Naragun. Here you will need to interact with 5 memory wisps: Seren, Armadyl, Zamorak, Bandos, and Saradomin (See map for locations).
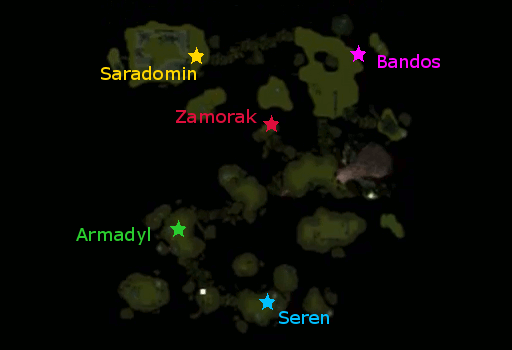 Image last updated: Jun 08, 2022 Update Image?
-
After interacting with each wisp, Guthix himself will appear in the Fairy Ring to the Eastern side of Naragun. You will have a relatively brief conversation about the actions he took during his life. You can choose any option after he berates himself. He will ask you to do a better job than he did before your screen once again fades out.
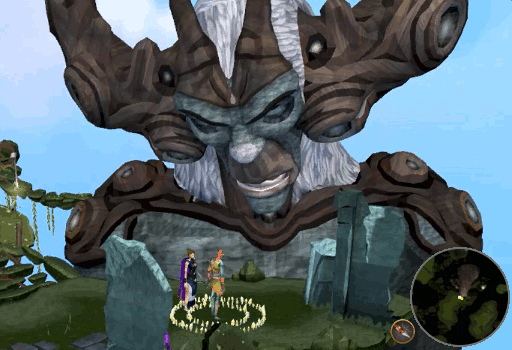 Image last updated: Jun 08, 2022 Update Image?
-
When you can see again, you will find yourself once more at Guthix's shrine. This time you will see a projection of the Needle spewing anima as it always has. You will need to switch each of the four Mutable Anima once, so that the green energy hits Kerapac instead of Gail.
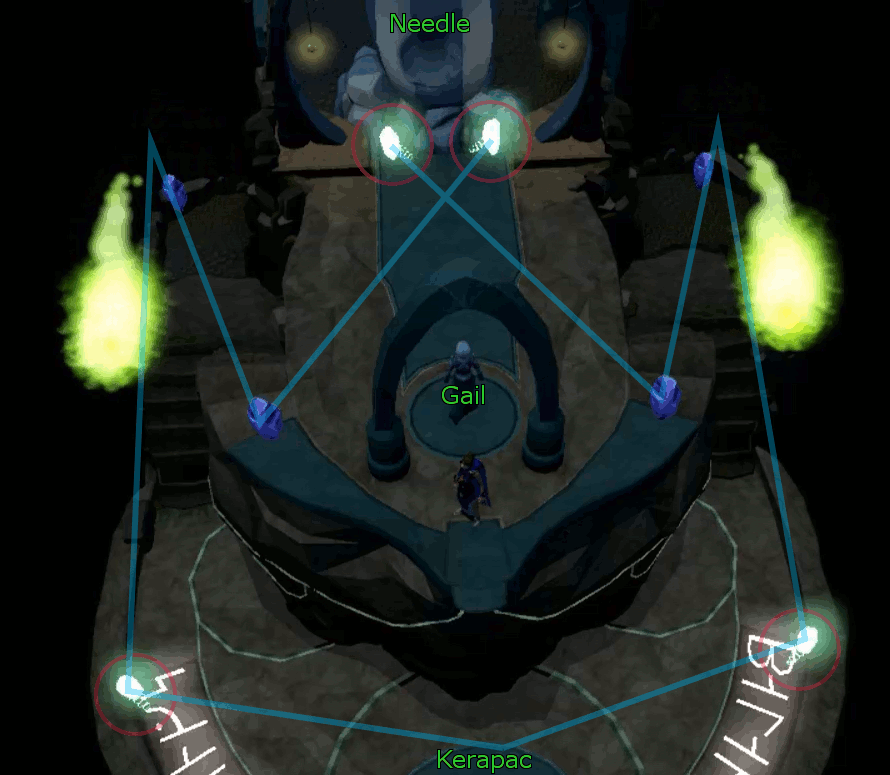 Image last updated: Jun 08, 2022 Update Image?
-
You will then be teleported to an area that looks like the Empyrean Citadel. You can stop and listen to Sliske if you wish, but it is not necessary. Enter the Room to the West. Here you will need to pass several obstacles to access the next room (See map). Continue around the citadel. Every other room will contain either Kerapac or Sliske talking about various plans; once again, these can be ignored or listened to if you have time. When you reach the final room, step through the doors to the South. This will present you with a cutscene of when Kerapac destroyed the Stone of Jas before teleporting you to the final room within Sliske's labyrinth.
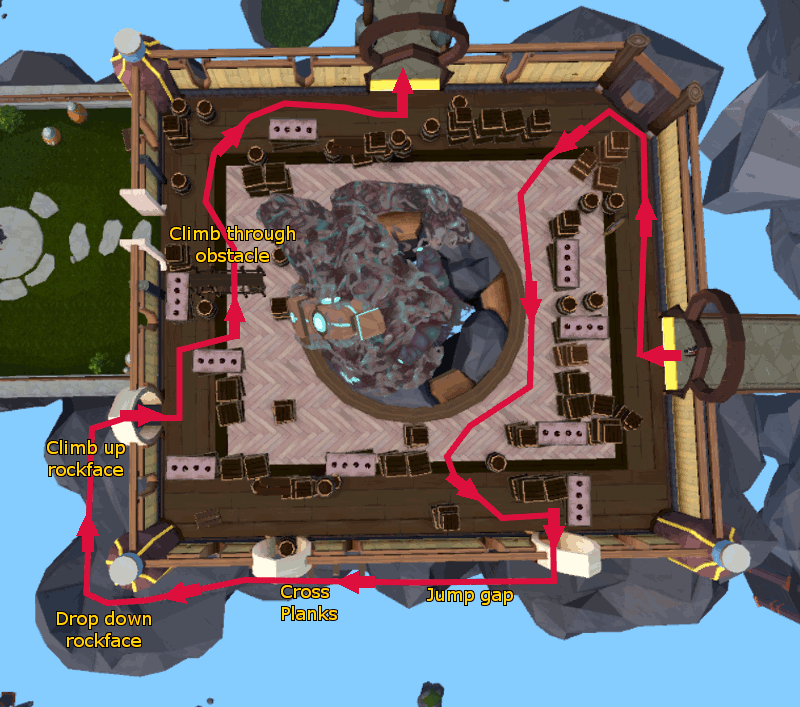 Image last updated: Jun 08, 2022 Update Image?
-
Once again you will need to switch all of the Mutable Anima to direct it to Kerapac. This time, however, multiple levels are involved. On the ground floor, switch the one in the North West corner then enter the temporal rift South of it (1). This will teleport you to the second level. Here you will want to switch the both Anima directly in front of you, then enter rift 2. You will now be on the 3rd level with Gail directly in front of you. Walk toward her and switch the last Mutable Anima. If everything has been adjusted appropriately, the Anima will now aim toward Kerapac on the ground and you will be teleported to an area that looks like Elite Dungeon 2.
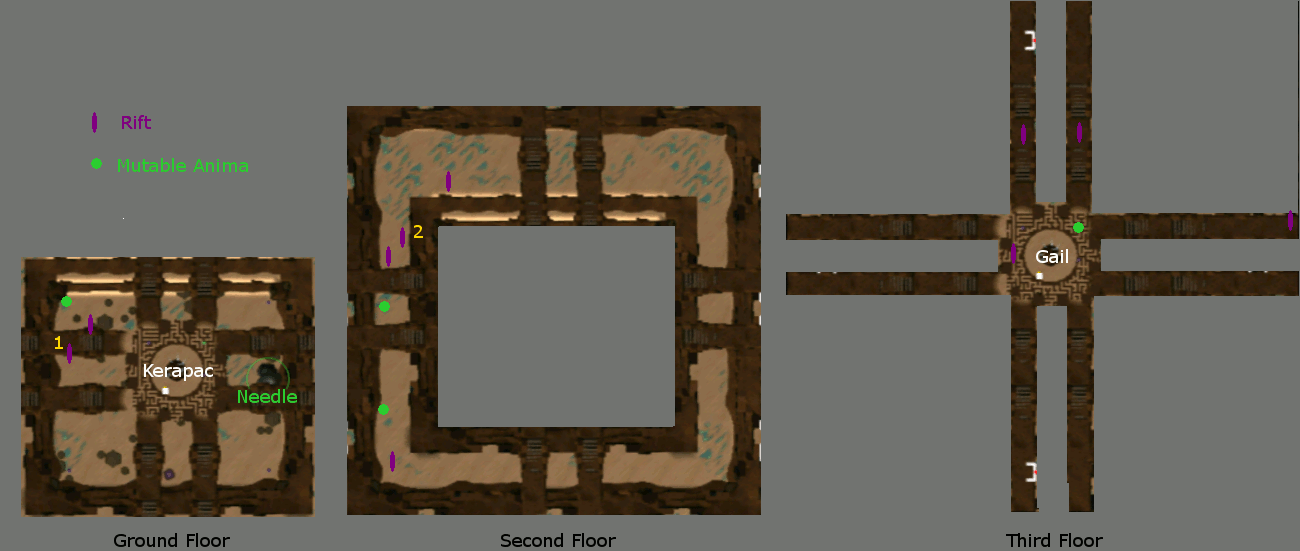 Image last updated: Jun 08, 2022 Update Image?
-
Within this area, you will need to unlock the ability to turn some of the Mutable Anima by collecting 3 different wisps. It is suggested to do this first so that they can be turned without having to backtrack multiple times. Simply collect all 3 wisps, then return to the beginning and adjust the Anima as necessary. After you have made your adjustments, your screen should fade to a cutscene. If it does not, you can walk to where the Black Stone Dragon spawns to find Kerapac in the middle of 4 rifts. See which one(s) is not feeding him anima and travel through that rift to see why it isn't sending any.
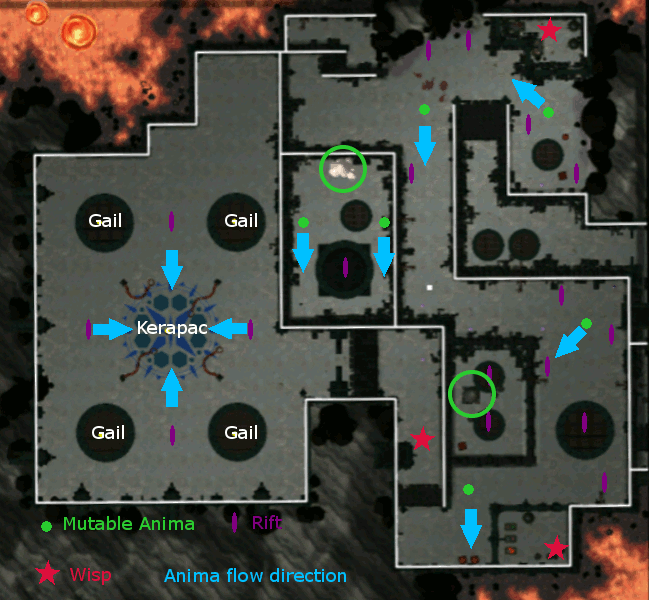 Image last updated: Jun 08, 2022 Update Image?
-
During the cutscene, you will learn more about Kerapac's true plans to sacrifice Gielinor for the good of other worlds. Gail will once again become Primrose and Kerapac will gain her powers as the one who controls the Needle. He will teleport the Needle away then fly off, leaving the four of you there. Charos and Thok will both be super angry with what has transpired. Primrose will be a bit confused and wish to see her mother.
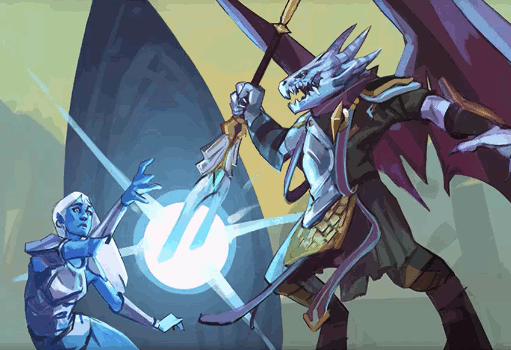 Image last updated: Jun 08, 2022 Update Image?
-
Return to the Burthorpe castle and speak with Seren. You will inform the council about what Kerapac has done as well as what his plans are.
 Image last updated: Jun 08, 2022 Update Image?
Congratulations, quest complete!
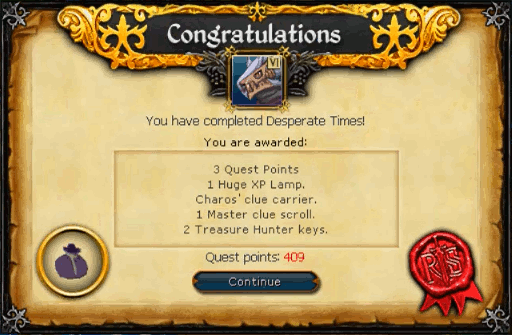
Image last updated: Jun 08, 2022 Update Image?
Rewards
Charos' clue carrier, Master clue scroll, Huge XP lamp, and 2 Treasure Hunter keys.
Guide Credits & History
| Writers | ChathMurrpau |
|---|---|
| First Uploader | Chath |
| Date Added | May 23, 2019 |
| Last Updater | Chath |
| Last Updated | Jun 08, 2022 |
Guide Feedback
Rate this guide
You can report issues without logging in. Log in to leave ratings and watch pages.
Want to help keep RuneHQ's guides up to date?
We're always looking for knowledgeable players to write, review, and improve our content. Join the team and help thousands of adventurers.