City of Senntisten
Quest Details
| Difficulty | Master |
|---|---|
| Type | Quest |
| Length | Long |
| Quest Points | 3 |
| Members | Yes |
Start Point
Requirements
Items Needed
| 1 Dragonstone | Rock Hammer* | Mattock* |
Items Acquired During Quest
Walkthrough
-
Talk to $plnkfull2727 outside the The Heart of Gielinor and accept the quest. She will insist that something must be done about the elder eggs, because apparently apocalypses aren't a good thing. Since you last spoke, she sought out "$plnkfull126" ($plnkfull3503' public persona) for assistance. When prompted, agree to enter the Elder halls with her.
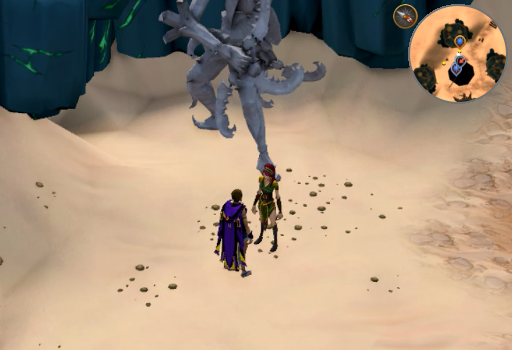 Image last updated: Sep 29, 2022 Update Image?
-
Once inside, talk to $plnkfull3503. After a bit of mild flirting between $plnkfull2727 and $plnkfull3503, he will say they need to prevent the eggs from hatching and the elder gods from touching them. You will be presented with 5 options. Suggest that they move the eggs to get them away from the anima of the Elder Halls and that they be drained. When they ask where to move the eggs, none of the options you are given are viable, so say that you're stumped and $plnkfull721 will appear.
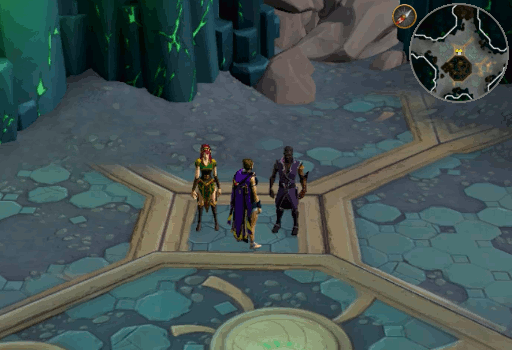 Image last updated: Sep 29, 2022 Update Image?
-
After $plnkfull721 tries to make it clear that he is here to help, he will ask how you feel about him: is he a friend or at least worthy of trust? The option you choose doesn't matter. After a little dialog, a cutscene will occur in which $plnkfull721 explains that the gods will have to help drain them and that the eggs must be kept away from the common folk. Thus, the recently uncovered City of Senntisten is a good place to relocate them. $plnkfull721 will teleport away, asking you to meet him at the Archaeology Guild, and $plnkfull2727 will ask you the same question about him, but again, your answer doesn't matter.
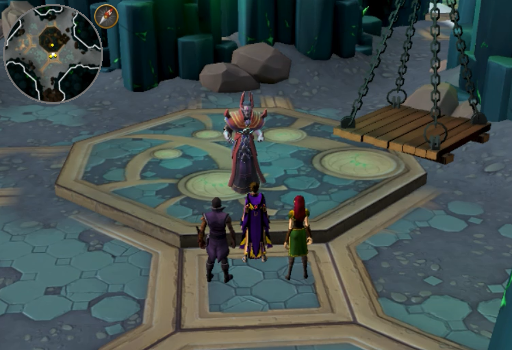 Image last updated: Sep 29, 2022 Update Image?
-
Make your way to the Archaeology Guild, head upstairs, and speak to $plnkfull721 (alias $plnkfull2372) on the balcony. He will talk to you, seemingly looking for some kind of affirmation that you consider him a friend. Your response doesn't matter, so say what you want. He confides that he doesn't think he could ever have true friends because his loyalty to Zaros would always come first. But now, he is without orders and with much more power that he can use for the good of Geilinor. Even as a god, he will need help to move the eggs, so he will ask you to enlist the help of Armadyl, Icthlarin, Saradomin, Seren, and Zamorak.
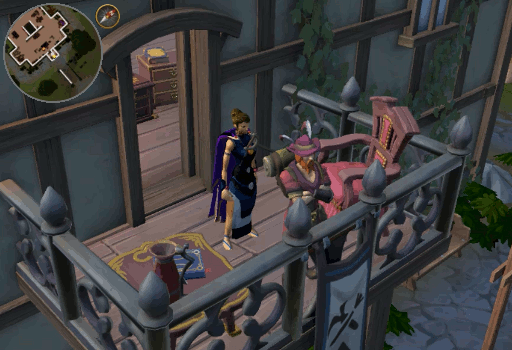 Image last updated: Sep 29, 2022 Update Image?
-
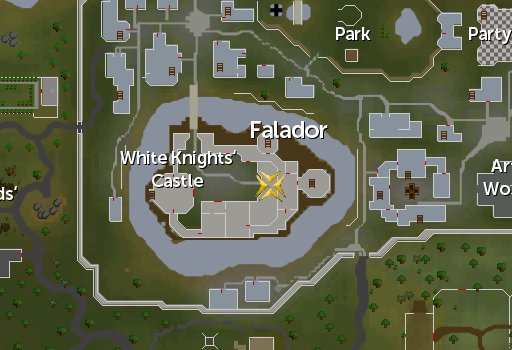
Convincing the gods to help can be done in any order, just make sure you speak to Moia LAST at the Burthorpe location. Click the images below to see a larger map image of the location.
-
Armadyl's Tower - North West of Port Sarim
Climb the tower to the very top by going up 2 sets of stairs. Armadyl will be on the edge of the landing. Talk to him and he won't require any real convincing, just complete the dialog.
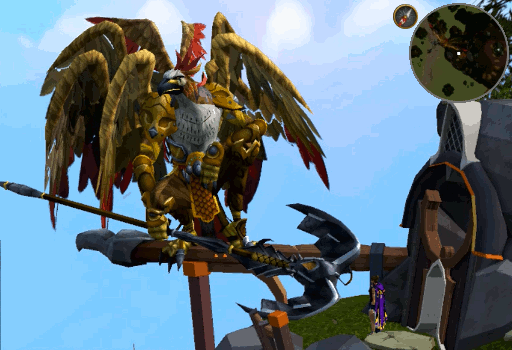 Image last updated: Sep 29, 2022 Update Image?
-
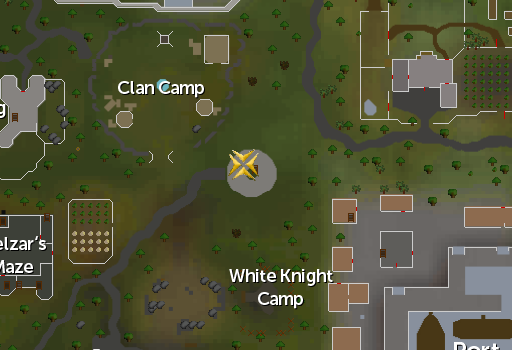
White Knight Castle - Falador
Climb the ladder of the East tower, move West two rooms, and climb the stairs. This will take you to $plnkfull2922's throne room. Talk with the former god. He won't require any real convincing, just complete the dialog.
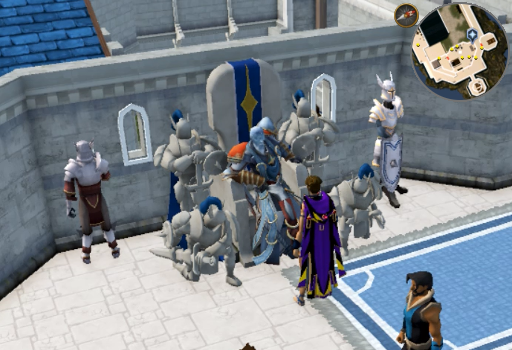 Image last updated: Sep 29, 2022 Update Image?
-
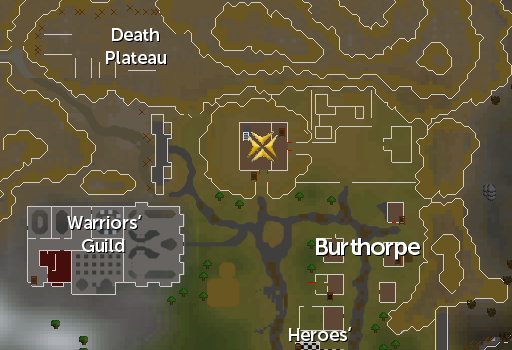
Burthorpe Castle - War Room
Climb the stairs to the war room and, when prompted, confirm that you are there for the quest.-
$plnkfull576 - After some discussion, it will become clear that he will not help in any way that $plnkfull721 plans, but will try to find other ways to help. Complete the dialog.
-
$plnkfull3505 - She will be disgusted by the situation but willing to help. Desperate times and so on. Complete the dialog and move on.
-
Moia - MAKE SURE YOU TALK TO HER LAST! When you ask her to contact Zamorak she will offer to teleport you to his hideout to talk with him; the $ilnkfull26011 WILL NOT work. Take her up on the offer and talk to $plnkfull3014. He won't require any real convincing, just complete the dialog. He will then trust that you can leave on your own. Don't ask him for help leaving, it's a waste of time as he will teleport you to the Northern end of Daemonheim as opposed to anywhere helpful.
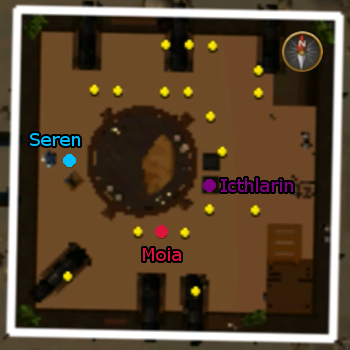 Image last updated: Sep 29, 2022 Update Image?
-
$plnkfull576 - After some discussion, it will become clear that he will not help in any way that $plnkfull721 plans, but will try to find other ways to help. Complete the dialog.
-
Armadyl's Tower - North West of Port Sarim
-
Return to the balcony on the upper floor of the Archaeology Guild and talk to $plnkfull2372. After you get him up to speed, he will tell you that Intern Jimmy is waiting inside to show you around Senntisten.
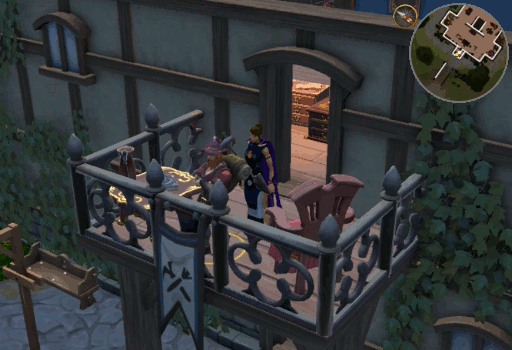 Image last updated: Sep 29, 2022 Update Image?
-
Grab your excavation gear (mattock and outfit), Sign of the porter (I, II, III, IV, V, or VI)/$ilnkfull29705 if you have them or ensure you have 25 open inventory slots, and travel directly North of the Archaeology Guild building. Note that you will not obtain any dirt on the next step, so an $ilnkfull31259 is NOT necessary. You will pass one excavation pit then encounter a large set of doors in the hillside to the East. Enter them and, when prompted, confirm that you want to continue the quest.
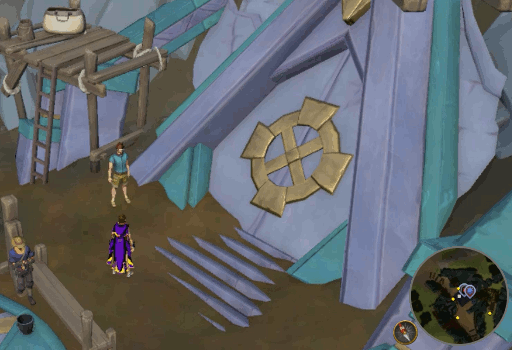 Image last updated: Sep 29, 2022 Update Image?
-
Once inside, walk South and begin to excavate the "Forum Entrance" hotspot. It is a level 74 excavation spot that yields $ilnkfull31161, $ilnkfull31172, and $ilnkfull31194. This will take a few minutes to clear and will look like the image below once completed.
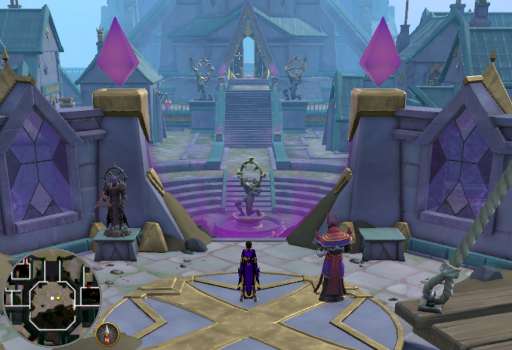 Image last updated: Sep 29, 2022 Update Image?
-
Search the pedestal on the West side of the barrier to receive a $ilnkfull31339. You will need to restore it, but don't worry, you can get the materials needed for free! Exit Senntisten using the pulley and talk to Intern Jimmy outside. He will give you the Archaeology materials you need: 16 $ilnkfull31161, 28 $ilnkfull31172, and 24 $ilnkfull31194. Go to any Archaeology workbench with a $ilnkfull353 and the statue to restore it. This will use materials from your storage box, not the noted ones from Jimmy, and award you with 5,600 Archaeology experience.
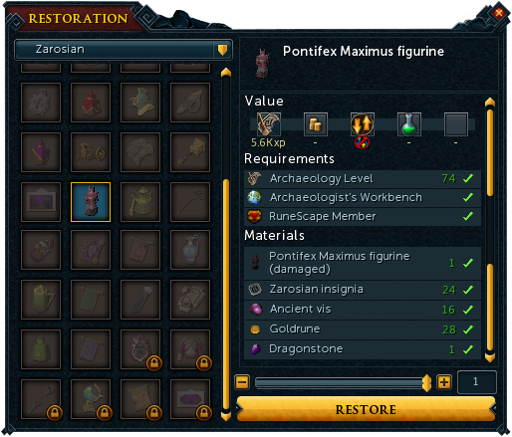 Image last updated: Sep 29, 2022 Update Image?
-
Return to Senntisten and interact with the Western pedestal to place the figurine on it (using the figurine on it does not work). $plnkfull721 will request that you follow him, so head South with him until he stops in the cathedral. On the way over, if you like you can pick up the Torn note for some additional lore. It is found just East of the stairs where you had to excavate, but it isn't necessary. Talk to $plnkfull721, and when prompted, say "No, let's bring in the eggs." (Chat option 5). After that, burn your way through the dialog.
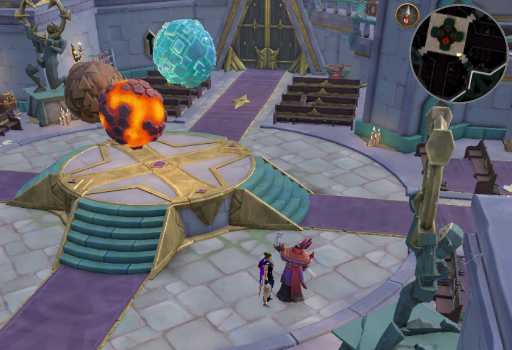 Image last updated: Sep 29, 2022 Update Image?
-
Now you will need to collect some Light globes and wards to fortify the cathedral against the elder gods. Search the cathedral until you find 2 Light globes. They are in a different places for every player, so we have outlined possible locations in the image below. Once you have found the Light globes, speak to $plnkfull721 again. He will realize there aren't any wards in the cathedral, but there may be some elsewhere in the city. This next part is much easier if you have means to heal yourself and good mobility (Bladed dive, double surge, $ilnkfull31013, $ilnkfull30467/Salt water spot at Oo'glog or Anachronia). Get anything you need to provide those tools, the Light globe(s), your best combat gear (Magic is recommended), and food/$ilnkfull14455. Make sure several of inventory slots are free, then return to the cathedral.
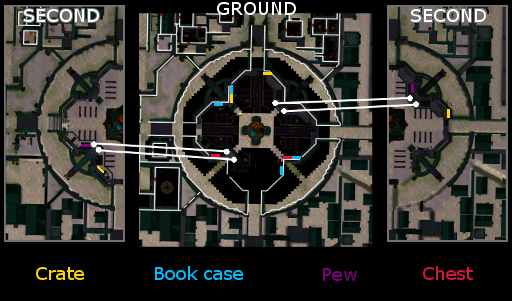 Image last updated: Sep 29, 2022 Update Image?
-
READ THIS WHOLE STEP BEFORE YOU PROCEED.
To obtain the wards, you will be running through the darkness of the city. Note that the area itself will not be darker, but you will gain debuff stacks called "Shadows of the Empire". So long as you have at least one stack, you will take damage once every 3-4 seconds. The amount of damage scales exponentially with the number of stacks; 1 stack will deal 1% of your maximum hitpoints, 2 stacks will deal 3%, 3 stacks will deal 6%, etcetera. Luckily, there are several light pedestals around the city that you can add Light globes and stand near (6 square radius), as well as many open buildings with illumination to stand in, to remove your stacks over time. Note that while carrying a ward (only 1 can be carried at a time), the light pedestals will not help you, but the open buildings will still work.
The map below shows what buildings are open, where the pedestals are, and where you can find other Light globes to place upon them. While there are 10 light pedestals, there are only 8 globes to be added and 1 that is already placed. Despite this, it is not necessary to collect and/or place ALL of the Light globes; though we do suggest at least the 4 as per mentioned in the map below. Note that every time you walk into the light of an active light pedestal, the shadow voice in your head will complain about it being bright which can be rather annoying. That being said, it is suggested to place any/all desired Light globes as/before collecting wards since they will not be of use when returning to the cathedral with them.
Keep in mind that if the damage from the darkness becomes too much and you have to go get food, it will not reset your progress when you leave, however, any wards currently in your inventory will disappear upon leaving. If the Shadows of the Empire "kill" you, $plnkfull721 will drag you back into the Cathedral and any wards you were carrying will need to re-obtained; note that this is a safe death. If you plan your steps carefully, a beast of burden will be less helpful here, but a bunyip or unicorn stallion with scrolls will serve as a good alternative.
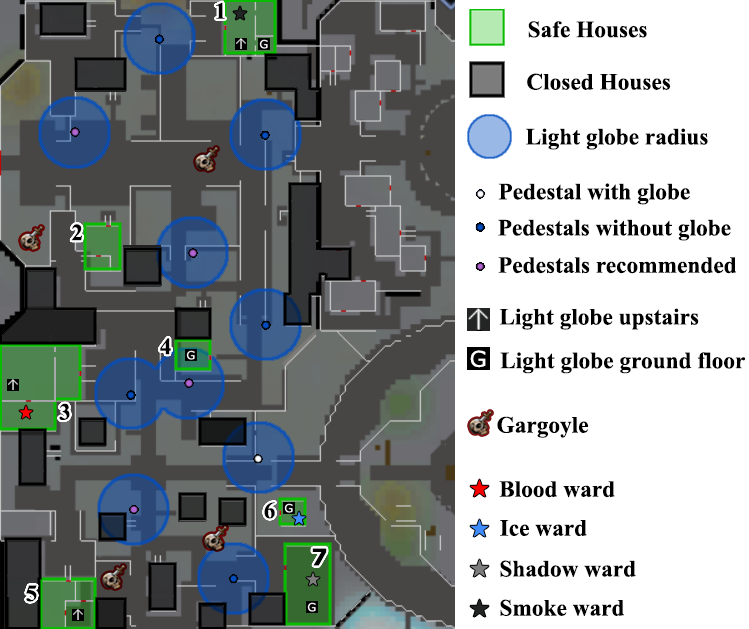 Image last updated: Sep 29, 2022 Update Image?
You can obtain the wards in any order you choose, so we will lay them out here alphabetically.
-
Before beginning this section, make sure you are geared for combat as you will be thrown into combat with a level 114 Blood warden the moment the puzzle is solved.
Pass through the cathedral doors to the West and go down the first two flights of stairs then make your way to building 3. Once there, inspect the Blood bottle (West room on the South wall) to discover that the room with the ward is locked with blood magic. Search the old desk (West room, center-East) to receive a $ilnkfull31864.
 Image last updated: Sep 29, 2022 Update Image?
-
Search the pile of books on the North end of the counter in the East room to receive a $ilnkfull31865. While you are there, you can visit the upper floor for another $ilnkfull31863 in the West room. In addition, you can walk around to the backside of the building to pick up the Scrawled note, but like with the Torn note in step 11, it isn't necessary.
 Image last updated: Sep 29, 2022 Update Image?
-
Next, head over to building 2. Search the Ransacked desk to receive a $ilnkfull31866. Take the time to read it, flipping through every page. If you don't see every page, you will not be able to progress. While in this building, you can also pick up and read the Bloodied note on the floor, but it isn't necessary either.
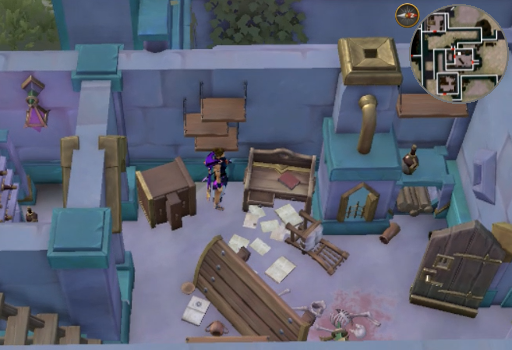 Image last updated: Sep 29, 2022 Update Image?
-
Return to building 3. In the West room, you can search the shelves to find various bottles of blood. Take a bottle of blood containing Human, Unicorn, Dragon, and Aviansie blood. You must pour the correct amount of each blood into the bottle you inspected earlier.
- Human blood: 2/8ths
- Unicorn blood: 3/8ths
- Dragon blood: 1/8th
- Aviansie blood: 2/8ths
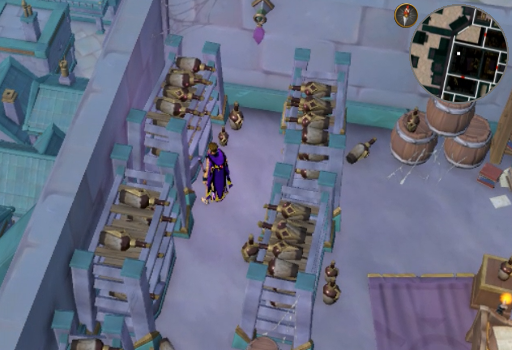 Image last updated: Sep 29, 2022 Update Image?
-
Proceed to show the Blood warden who is boss. It will attack with melee, but is not weak to any style, and will heal itself every few seconds. With level 70+ power armor and a few sharks this shouldn't be a problem for most.
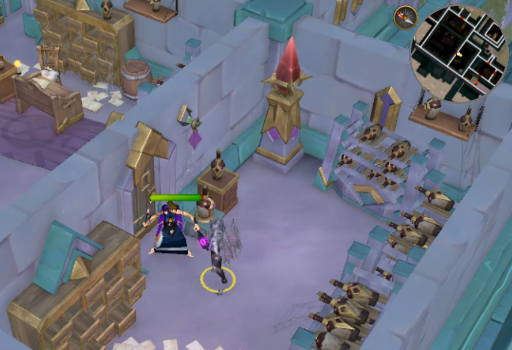 Image last updated: Sep 29, 2022 Update Image?
-
Once you finish killing the Blood warden, take the $ilnkfull31868 from the pedestal and activate the blood bottle by the door to get out.
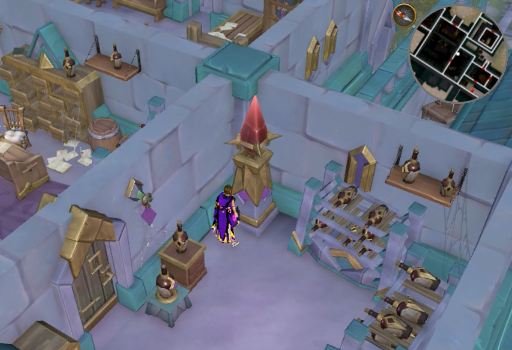 Image last updated: Sep 29, 2022 Update Image?
-
Now make your sprint with the $ilnkfull31868 back to the cathedral; remember that the pedestals will NOT remove the Shadows of the Empire while holding the ward. Talk to $plnkfull721 to turn in the $ilnkfull31868 then $plnkfull2922 will appear on the South side of the Eggs and have a conversation with $plnkfull721. Once completed he will remain in the Cathedral.
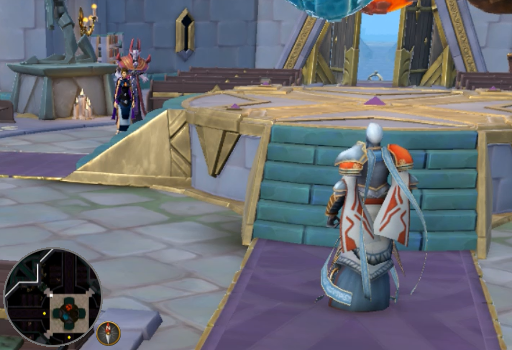 Image last updated: Sep 29, 2022 Update Image?
-
Pass through the cathedral doors to the West and go down the first two flights of stairs then enter the open building just South of that landing.
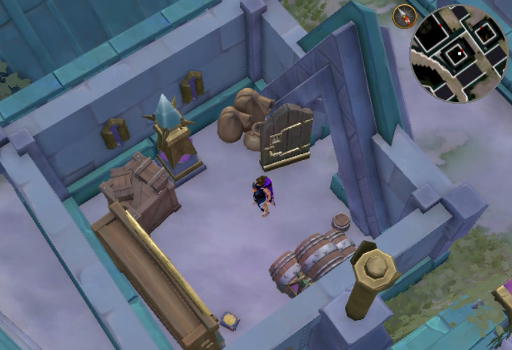 Image last updated: Sep 29, 2022 Update Image?
-
Pick up the $ilnkfull31867 and, optional, $ilnkfull31863 (assuming you haven't done so already) then make sure you have no Shadows of the Empire debuffs.
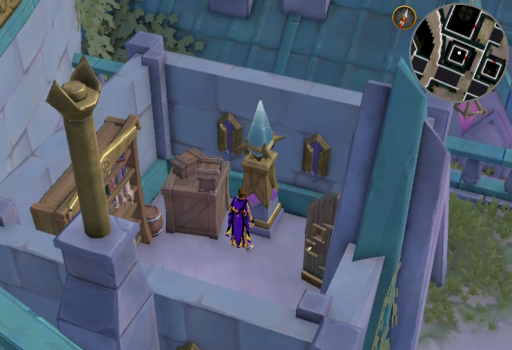 Image last updated: Sep 29, 2022 Update Image?
-
Once you do, exit the building and return to the cathedral. Talk to $plnkfull721 to turn in the $ilnkfull31867 then $plnkfull3505 will appear on the West side of the Eggs and have a conversation with $plnkfull721. Once completed she will remain in the Cathedral.
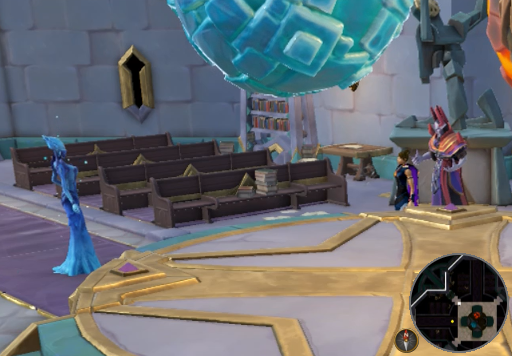 Image last updated: Sep 29, 2022 Update Image?
-
To obtain the $ilnkfull31870, make your way over to building 1. Once there, climb up the stairs and take the Inquisition Journal from the South side of the desk to receive the $ilnkfull31875 (yes, the item has a different name from the object). Read the book, being sure to visit each page, and then look at the drawers on the North wall.
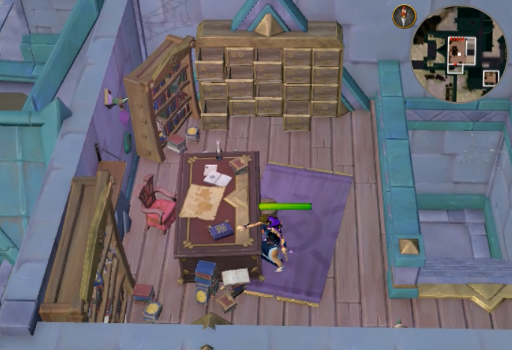 Image last updated: Sep 29, 2022 Update Image?
-
Your goal is to only have open the correct combination of drawers - these create the shape of a capital "I". If just opening/closing the drawers to create the shape doesn't work, you may need to create the shape the long way. Close all the drawers (suspicious button on the West wall) then interact with the drawers labeled by letters in the order T-I-T-U-S D-A-G-R-O-D-A C-A-S-T-Y-X G-R-E-A-D-Y. This will cause you to open and close several drawers and should leave you with the same letter I shape as mentioned earlier. Upon completion you should receive a notice in your game dialog box telling you that the magic around the ward has faded.
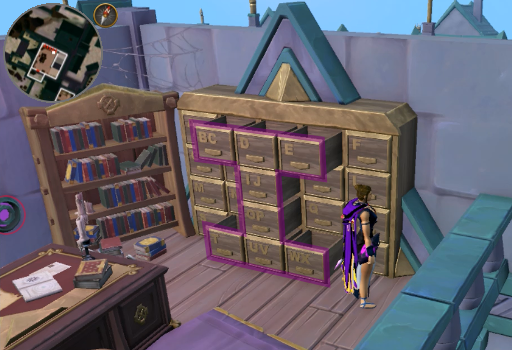 Image last updated: Sep 29, 2022 Update Image?
-
You can now go down the stairs and collect the ward from the Southern room behind the stairs. Before leaving, if you haven't done it yet and would like to, grab the light orbs from each floor and prepare for the hardest sprint of the quest.
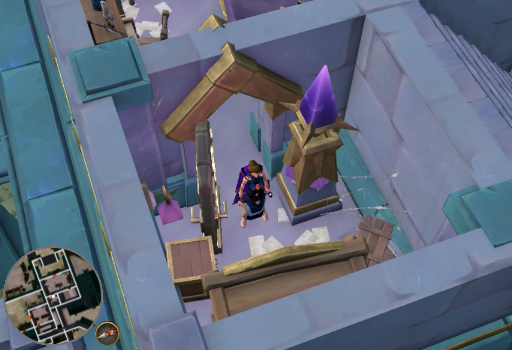 Image last updated: Sep 29, 2022 Update Image?
-
The path you must take back to the cathedral from this location is easily the longest out of all the wards, so make sure that everything you have at your disposal to enhance your mobility is at the ready. During your run back, be sure to keep your hitpoints well above 50% if possible, as the damage taken from the stacks of Shadows of the Empire get progressively higher and higher as you run and continue to gain stacks. You can take a moment to dip into building 2 or 4 on the way to let your stacks go back down to make this much easier. Once you arrive at the cathedral, talk to $plnkfull721 to give him the $ilnkfull31870. Zamorak will appear on the North side of the Eggs and have a conversation with $plnkfull721. Once completed he will remain in the Cathedral.
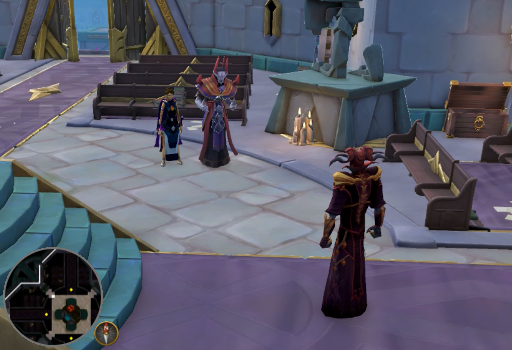 Image last updated: Sep 29, 2022 Update Image?
-
To obtain the $ilnkfull31869, head over to building 7. If you like, on the way over you can pick up the $ilnkfull31863 from building 5, but that's optional if you have not yet done so. In building 7 you will see the ward is surrounded by statues that prevent you from reaching it.
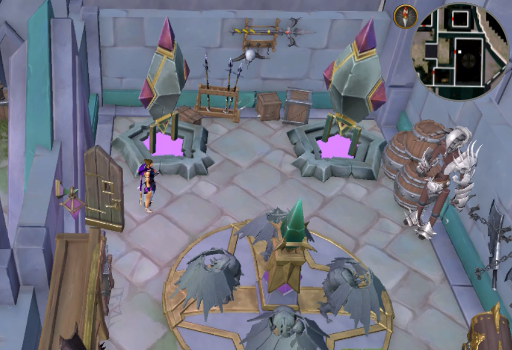 Image last updated: Sep 29, 2022 Update Image?
-
Attempt to smash one of the statues. When you do, the gargoyles will fly to different parts of the city. Unfortunately, so long as any of them live, you cannot take the $ilnkfull31869 from the pedestal; so it's Gargoyle hunting time. Having more Light globes makes this part smoother (see map above), but you can easily just use one light orb and move from pedestal to pedestal, placing it there to remove your stacks before moving to the next one.
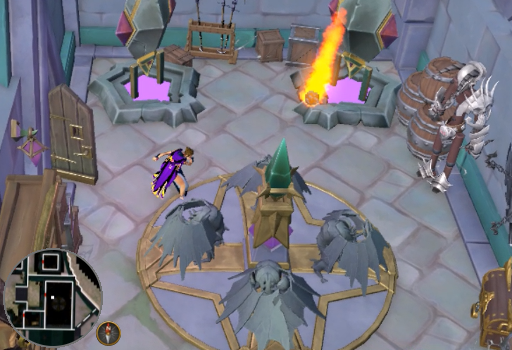 Image last updated: Sep 29, 2022 Update Image?
-
The Gargoyle sentinels each have 25,000 hitpoints, hit significantly higher than normal gargoyles (Deflect melee is still more than enough to make this manageable), and are weak to magic, so plan accordingly. To fight them, simply smash the "statue" (with the $ilnkfull1727) and they will start attacking you. You will need to lure them into an area where you won't be taking damage from the stacks of Shadows of the Empire, especially if you are using melee. Do so by smashing the statue to start combat, hitting them once, and then running to a place where you are protected from the shadows. Keep in mind that if you have not purchased the "killing blow" ability for Gargoyles from a Slayer Master, that you will need to use the rock hammer on it once it reaches 1 hitpoint. Note that it is possible to fight more than 1 Gargoyle at a time.
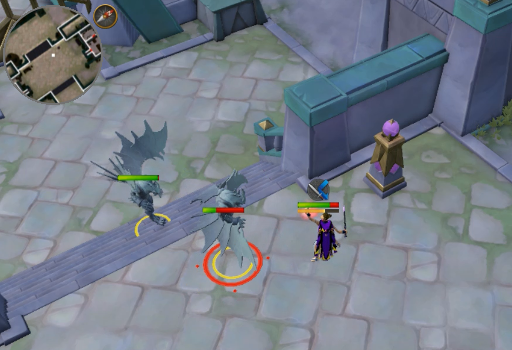 Image last updated: Sep 29, 2022 Update Image?
-
Locations (also seen on the map above) :
- Outside Building 7, just North West of the stairs.
- North of the closed building just East of Building 5.
- Central walkway between buildings 1 and 2.
- West of building 2, North of building 3.
-
With all the gargoyles dead, return to Building 7 to retrieve the $ilnkfull31869 and run it back to the cathedral; remember that the pedestals will NOT remove the Shadows of the Empire while holding the ward. Talk to $plnkfull721 to turn in the $ilnkfull31869 then Armadyl will appear on the East side of the Eggs and have a conversation with $plnkfull721. Once completed he will remain in the Cathedral.
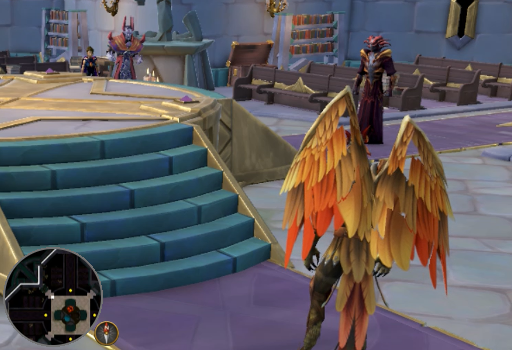 Image last updated: Sep 29, 2022 Update Image?
-
Before beginning this section, make sure you are geared for combat as you will be thrown into combat with a level 114 Blood warden the moment the puzzle is solved.
-
Talk to $plnkfull721 one more time and $plnkfull2953 will project himself into the room to speak. The gods will decide that $plnkfull721 should lead the armies against the elder gods while the others siphon anima from the eggs. Once the dialog completes so will your quest.
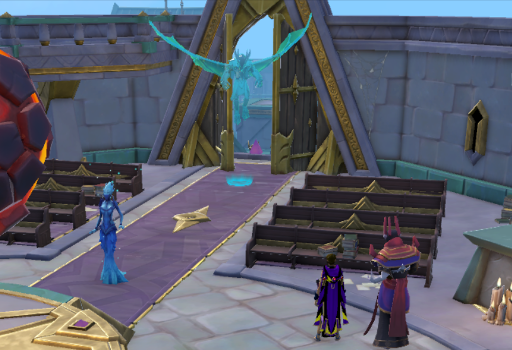 Image last updated: Sep 29, 2022 Update Image?
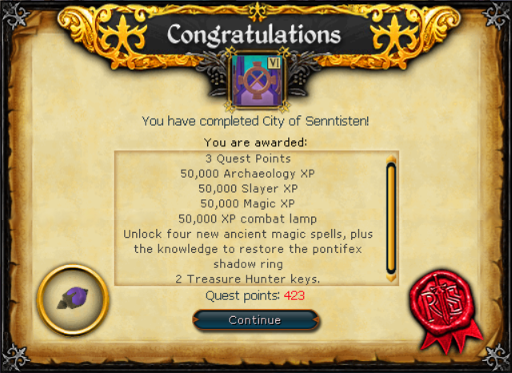
Congratulations, Quest Complete!
Upon completing the quest you will gain the ability to make a $ilnkfull31800. To do so, take the $ilnkfull31799 (reclaimed from $plnkfull2727 in Kharid-et if previously lost/destroyed) and a $ilnkfull353 to an Archaeology workbench. The restoration yields 2,193.3 Archaeology experience. The resulting ring can teleport you to the cathedral and can then be upgraded using anima dropped/harvested from within the Senntisten Elder God Wars dungeon.
Using 1,000 of each anima on the ring will provide additional benefits while worn:
- Bik: The stat drains cause be Croesus's attacks are reduced by 25%.
- Ful: Incoming damage from the lava Geysers in Zuk's fight is reduced by 25%.
- Jas: The impact of Kerapac's slam attack no longer stuns you.
- Wen: Your protect/deflect prayers/curses are 10% more effective against the Arch-Glacor's basic attacks.
With all 4 animas used on it, you can now gain up to 8 Tier 3 Elder troves per hour; these have a chance to contain Pernix Quiver fragments. After this, you can bring the ring to $plnkfull2890, in the cathedral, with 5,000 of each anima to make all the abilities of the ring passive effects that apply regardless of whether or not you wear it.
Rewards
| 50k Archaeology experience | 50k Slayer experience | 50k Magic experience | 50k xp Combat lamp | ||||
| 4 Ancient Magicks spells | Ability to restore the $ilnkfull31800 | 2 Treasure Hunter keys |
Guide Credits & History
| Writers | Dimir Editor and ChathMurrpau |
|---|---|
| First Uploader | Chath |
| Date Added | Apr 05, 2022 |
| Last Updater | Chath |
| Last Updated | Sep 29, 2022 |
Guide Feedback
Rate this guide
You can report issues without logging in. Log in to leave ratings and watch pages.
Want to help keep RuneHQ's guides up to date?
We're always looking for knowledgeable players to write, review, and improve our content. Join the team and help thousands of adventurers.